So lets get on with it...
- Reboot/Startup the HTPC with the USB pen drive we create (chapter 1.2) plugged in and let it boot in the USB Slackware installation
** If you can not boot in the USB pen drive make sure your BIOS is set to boot USB devices first. Some vendors even provide a boot-up menu selection when a F?? key is pressed during the BIOS post process. - Proceed by pressing enter when you reach the "boot:" section shown bellow

- Follow the on-screen instructions to select your keyboard map or just press enter if you're not bothered that much :)

- Login as root and verify the USB pen drive has been mount automatically on the system
You should see a similar output to the one shown below at the end of this step.root@slackware:~#cd /usbinstallroot@slackware:/usbinstall#ls
- Exit the previous folder location and setup your system and swap partitions by typing cfdisk at the command prompt
** A typical sequence of commands in cfdisk to setup the two partitions is:root@slackware:/usbinstall#cdroot@slackware:~#cfdisk
[System Partition] New->Primary->(type the main linux partition size)->Beginning->Bootable->Write->(type yes)
[Swap Partition] (Press the Down Arrow to select the Free Space partition)->New->Primary->(type the swap partition size)->Type->(press a key to move on to the next screen)->(type 82 if not already set)->Write->(type yes)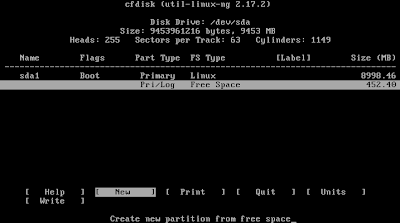
The final partition allocation in cfdisk before quiting should look similar to the image below
- Initiate the Slackware setup process by issuing the setup command at the command prompt
root@slackware:~#setup - Start with the swap partition setup and accept the default provided options

 ** NOTE: The setup process will proceed on setting up the target partition automatically after the swap is ready. To simplify things this extended process is broken down into individual key points starting with the preparation of the target partition on the next step.


No comments:
Post a Comment